Low-Stress Gingerbread House ConstructionOne of the most enjoyable parts of building a gingerbread house is the gingerbread house construction phase.
It can also be the most frustrating if you don't know what you're doing. Don't worry... read through this page and you WILL know what you're doing. There's even a link at the bottom to video demonstrations of gingerbread house-building For this project, we are performing our gingerbread house construction from these size pieces. You can adjust them as you see fit for your own design. But, remember that the gingerbread house construction is important to the strength of your house so you should first have built a model out of cardboard. Cut out your walls based on those dimensions.
Gingerbread House Construction Directions Applying the Icing
Tips For Assembly...
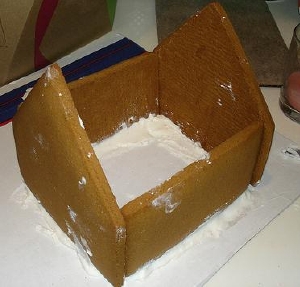
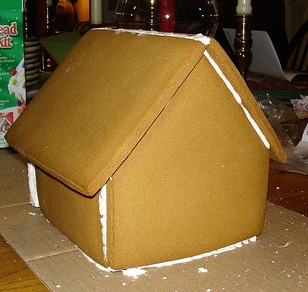
When assembling, use the gingerbread house icing to apply the joints of the house. Apply a generous amount but not dripping- to glue one side of the joint. Put the icing on only one side and then press the other side to the side with the icing glue to connect them. Hold this in position briefly until the icing has set and the two pieces will hold together. You can also use cans or other sturdy objects to help support the pieces until the "glue" dries. You can also use gingerbread house icing to connect the walls to the floor. Use the same technique explained above. Get started with decorations...To apply candy decorations, use a small amount of the icing again as the glue to fasten the candy pieces to the gingerbread house. Hold the candy piece in place until it sets. You can also use dough scraps to roll out added decorative cut-outs to be applied with icing glue. You can impress the cutouts with designs before baking for an added touch. If you want to have the walls covered in icing, you will want to thin the icing with a bit of water and spread it gently on the sides before you assemble the house. Allow the icing paint to dry before continuing to assemble the house. You will want to apply the glue icing using a pastry bag so you have more control over where the icing is going. If you allow it about 30 minutes to set before you assemble, it will help the pieces adhere better which makes your completed house stronger. For the icing decoration, use your pastry bag again but with various decorating tips or a knife. You can easily fill in gaps and smooth gingerbread house construction errors with icing and candy decorations. Wipe off smudges or drips with a clean, damp paper towel. Just let your artistic instinct kick in here to help you decorate smoothly and creatively. Now that you've completed your gingerbread house construction, you can move on to the most fun phase... decorating! This is where your edible house turns into a dream gingerbread house! Want to see Video Demonstrations of Gingerbread House building? These videos will teach, entertain, and inspire you. Have a question or an idea about gingerbread house construction? |
Free NewsletterGingerbread Patterns
Search This Site

Custom Search
|
|||||
|
Enjoy This Site?
Then why not use the buttons above to add us to your favorite bookmarking service? |
||||||
|
| HOME
| Contact Us
| About Us
| Disclaimer
|
| Privacy Policy
| Compensated Advertising
|
Return to top |
||||||
|
All Rights Reserved. | ||||||